![]()
![]()
![]()
![]()
Pose Method of Swimming
At only between 10-15% of total race time within triathlon, it is unlikely that you are going to win any races whilst in the water. If competitive within the sport, leaving the water with the lead athletes can be essential to finishing high in the field. When new to the sport, an uncomfortable swim can make for an uncomfortable entire race and caution should be taken to ensure you have a good experience when in the water.
The focus for both these groups, those looking for every extra second of speed to those that are happy with completion should be on efficiency. Why? Because when you look at the spread of triathlon performance- despite some extremely high fitness levels the swimming performance seems to drag behind the cycling and the running performances.
There are several specific conditions that are unique to open water swimming, such as: the length of the swim, the fresh water in rivers or lakes and salt water in the sea or ocean with great variation in temperature, currents, waves, wind and the need to navigate yourself without the help of a pool line or rope all whilst managing the chaotic nature of a mass swim start- all these conditions make triathlon swimming a specific skill that requires great preparation.
As with running and biking, swimming has a definite technique that should be acquired and learnt. In fact, the same principles that help us move in running and biking also move us in swimming- The ID and development of support. No matter which environment we are moving within, we have the same rules and laws for performing efficient movement. Swimming is no exception.
In the Pose Method of swimming we stick to the same principles of efficient movement that we discuss for running and biking, however, in swimming because of the specific medium of water we make the point that there are two support systems working simultaneously: floating and moving support.
Finding Support in Swimming
Within Pose swimming the support is found at two points. The floating support is found along the underside of the body, a good example of finding floating support is to practice floating in a “Dead Man’s Float”, this is simply- The Floating Support. By using the surface area of your body to its maximum potential, you have increased the amount of support that the water affords you. Instead of sinking rapidly, you should be able to sustain this float for quite some time.
Floating support is indeed a passive support, it is optimised by doing as little as possible, relax and breathe as normally as possible allowing nature to control the situation.
However, there is no movement forwards with floating support, to actually swim, we have to maintain passive (floating) support and add active (moving) support. Just as there is passive support on the bicycle, found at the handlebars and the saddle, and the active support on the pedals, the same dynamic is at work in the pool. Here the body provides the passive support on the waters surface and the moving support is found on the hands.
Floating Support= The Body (Passive)
The point that has to be made when describing swimming in terms of the Pose philosophy of movement is that the same laws apply, but we are using two support systems at once. The first support system will be referred to as the floating support in which we are merely establishing horizontal equilibrium. Floating is a standard with which we can measure technique, it is as simple as that.
Moving Support= The Hands (Active)
Once you ‘get’ the principle of providing moving support through your hands, your approach to swimming is suddenly simplified and you begin to have one key goal- to get support in your hands.
Moving support is the balance relative to the water and the arm when the arm is in the water: we are moving relative to the water and relative to the body. The arm action is the intermediary or transmitter. It is used for moving from one support to the other and is keeping the body moving relative to support, which is the arm, the arm is using water as support, it needs to have a relationship with the support system which is the water, this relationship is what creates movement.
The arm is always relative to the body and relative to the water. It is in front of the body and moves through the water to get to the general center of mass (GCM). It must find still water in order to continue movement.
What is Swimming Feel?
A swimmers feel is a bit of a mythical, unobtainable reference to what good swimmers do. Try this? Ask your swimming buddies to tell you what feel in swimming is exactly and you’ll be met with some confused answers. In reality it is not remotely mythical or unobtainable and it can be yours by taking some simple steps.
Swimming feel is your ability to perceive your body weight in your active support. At the end of the last section I said this “The hand must find still water in order to continue movement”, Its your ability to find this still water that determines the quality of your active support.
How do you do this? Use the drills below, starting with the dry land drills where it is easy to perceive the bodyweight in your hand, then you’ll progress to using the side of the pool, then a partner and then the water to keep developing your feel or application of bodyweight. Each step decreases the density of the object you are finding support against and with each step you’ll start to hold more and more water.
What is Swimming Balance?
Balance can be found on two axis, both the fore and aft (horizontal) and the left and right equillibrium.
Horizontal Equilibrium
The horizontal balance can be found by learning to maintain support evenly between the upper and lower body in swimming. To reduce your surface area as much as possible it is important to develop a foundation of floating support that sees the feet level with your shoulders. This horizontal balance can be developed by practicing the drills for floating support you can find below.
Left and Right Equilibrium
An efficient stroke is dependant upon your stroke timing and your application of bodyweight to your left and your right moving support.
The balance phase of swimming is long. The support phase begins when the arm enters the water and starts moving from the front part of the body toward the center of mass. It ends when it reaches the center of mass and the other arm begins its support phase. In running the support phase is short and precise, in swimming it is longer, goes through movement, and interacts with the medium of water
The moving support is the one which allows changing support and changing balance from one side of the body to the other. The pivotal point happens when the arm reaches the general center of mass.
Hip Action?
The hips rotation is related with the arm pulling movement and not vice versa. Contrary to the belief that hips are power producers, hips actually play an un-weighing role. The hips are a floating support for the moving arm, they simply move as a result of the arm reaching the end of the stroke at the hip or the GCM.
At this point the hips are no longer needed for support and they simply un-weigh so that the next support can begin. The movement of the hips is the result of finishing the moving support – not the other way around. They do not initiate the movement, (if the movement were to be initiated by the hips, you would no longer have any stability from the hips to use for your moving support) the support arm must have the stability for the hips to move forward, once the arm reaches the hip, the support in the hips and the whole body shift and a new support phase begins on the other side.
The hips merely un-weigh to allow shifting to the next support.
When we finish the moving support and the arm position comes close to the hip, there is no longer any necessity to stay on this side – that is why the hips rotate. The stroke is done, the GCM has been reached and a new support arm is ready to work.
It is the hip of the support side that moves away when the arm reaches the GCM not the opposite hip beginning a propulsive movement (as is commonly believed) before the new cycle begins.
The hip on that side is now ready to anchor the new support arm. Anchor it as opposed to sinking it, which is what would happen if it were to move before the arm. If it moves and swivels, it will drop the floating support and leave no basis for the moving support or the stroke. In order to shift weight we have to finish support.
The body would move in chaos, if we do not understand this relationship. The relationship between these phases of support is transformation of energy. Where the energy transformation goes, there the support is moving. For energy transformation we need support, so support is following the vector of energy. Support should go together with transformation vector.
The hip un-weighs at the pivotal point.
To activate the opposing hip is to move it without a support system. We need to work with the hip which is on the same side as the pulling arm. The hip that we are concerned with is the hip on the working side, not the other one. We have to learn that. We teach the following elements of swimming technique:
- Floating Support
- Moving Support
- Floating Support Shift
- Moving Support Shift
Hand Action?
The recovery arm enters the water when the support arm is finished with its work, at the GCM. If this timing is off it will result in a loss of support and therefore a decrease in propulsive force and balance.
As you can see in the picture below, when you swim efficiently your hand enters and exits the water at almost the same place. When swimming you feel like your hand is moving back behind you, but in reality your body is moving past your hand (moving support).
Once you put your hand in the water it makes a slight sculling action to find still water and presses down- but it never pushes back (pressing naturally creates a high elbow). At this point, your lead arm acts as the transmitter of energy (gravity) supplied by your displaced body weight (rise) as you lift your chest over your hand (moving support). When your GCM is over your lead hand your recovery arm is now about to make entry to the water- this is where you change support- and balance- from one hand to the next (fall) and continue with forward momentum.
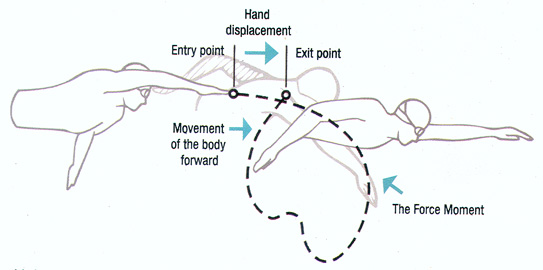
John Robson, (July 2007) Pose Tech, http://www.posetech.com/library/C/pose-swim-graph-lg.jpg, 17 December 2013
As with cycling, you can’t have the recovering limb working while the support limb is working because the support limb’s work will be diminished. In swimming the stroke of the supporting arm will be interrupted and the swimmer will not be able to continue moving past their support.
This is a double inhibitor for efficient forward movement: If the support arm is interrupted by activity of the swing arm, the movement gets diverted and the floating support gets thrown off. So not only does the swimmer flounder (a split kick may be noticed at the legs) in the water without propulsive driven movement, he is also thrown out of the frame for setting up his next stroke.
Breathing
The key to breathing is in relaxation, when you become tense or use too much muscular effort during swimming this relaxation can be lost. The affect of losing your relaxation in breathing will cause discomfort but will also impair your ability to maintain your floating support. We are not particularly buoyant when tense, a stressed and almost empty lung is likely to increase our density and propensity to sinking. When breathing we want to maintain a relaxed equilibrium with our lung capacity that enhances our floating support.
Breathe Management
Lung comfort is controlled by steadily allowing air to escape from your nose and mouth whilst your head is under water, the visual cues for good practice of this technique are a stream of bubbles that gently flow from your nose and mouth without any force. Kinaesthetically you feel completely relaxed to just let the air slowly escape. A great breathing drill is to practice this relaxed air escape from nose and mouth in the bath or whilst standing at the end of the pool, see how long you can stay immersed while you slowly let the air escape, time your efforts and see how relaxed you can stay when you bring your head from the water.
The speed at which you let the air escape from your nose and mouth only increases when you start to rotate your head to take a new breath. Just as you are about to surface you want to let out a slightly harder exhalation. This then allows you to inhale through your mouth once you reach the air.
Some of the common issues with breathe management include many people trying to only breath in and holding their breathe under water to then try and exhale and inhale whilst out of the water, the implication is a huge loss of floating support. Also, if you force water out too quickly whilst under water you will rapidly feel out of breath, if you rapidly decrease the size of your lung you’ll find it hard to refill when you breathe in through your mouth when you surface.
Breathe Mechanics
This is where a lot of swimmers become completely confused. At what interval should I try and breathe? Should I breathe bi-laterally?
The key to good mechanics is to attempt to maintain your floating support without disrupting the rhythm and movement of your active support at your support arm. Great timing of your head rotation times the breathe to be taken under your recovery arm and to return to your neutral position before making active support overhead. Minimal movement of your head rotation has to be the aim, aim to rotate on a spit to the side and stay low with your head as you take the breathe, a good drill is to take a breathe ensuring that you keep your underside goggle in the water, this will have minimal impact upon your floating support.
One of the most common mistakes made with breathe mechanics is to look forwards or lift the head during taking a breath, the impact is an awkward movement that again negatively impacts your floating support.
It would be my preference for you to learn to breathe bi-laterally, if you are pool swimming there are negative connotations to becoming one sided but it is when you start to swim open water that the negative impacts of being a one sided breather become more profound. You need to have options when you are swimming open water, if you only breathe right on a sea course that goes anti clockwise every time you breathe the likelihood is you’ll be breathing into a swell, also, if you have choice as to the side that you breathe you can make a choice to breathe away from the sun that will stop you from becoming dazzled as you swim. If you really struggle with breathing bi-laterally I would conscientiously work on balancing your perception and strength of both your right and left supports, an impossibility to breathe on one side is normally supported by an ineffective active support on the opposite arm that probably slips through the water with a low elbow.
With regard to breathe intervals, its all about maintaining your relaxation. Someone who swims relaxed with a higher cadence is likely to be able to go more strokes without taking a breathe while maintaining relaxation. The slower the cadence of the stroke the shorter the interval for taking a breathe. So, someone with a high cadence may be able to breathe every 5 strokes while their swim partner with a slower cadence may have to breathe every 2 or 3 strokes to maintain the same level of relaxation as they run out breathe under water at greater intervals. The key being to maintain relaxation, and we come full circle.
Kick Mechanics
The role of the kick within endurance swimming and triathlon is more of maintenance of floating support and less of propulsion. The shorter the race becomes the more active and propulsive the leg kick. Your options for kicking are a 2-beat or a 6-beat kick, a 2-beat kick anchors with one kick as you unweight the opposite hip and 6-beat kick anchors with the last of a three kick sequence on each side.
Some of the important factors to consider here are that you maintain your floating support with your legs high in the water, your drag will increase rapidly if you are angled down in the water dragging your legs along.
You should also aim for a tidy close together flutter kick from the hip rather than an expansive boom from the knee with your legs, this is largely created by getting and maintaining support at your front end. Ensuring you have appropriate ankle mobility is key to a good swim kick, the fascial dynamic warm ups for running address this also and encourage appropriate ankle range of motion so you can comfortably sit on your shins with your toes out behind you.
The Pose Method Swimming Drills
Stage 2 – Drills For Floating Support
Stage 3 – Drills For Moving Support
Stage 4 – Water Polo Drills
Stage 5- Diving Drills